Target Hits The Mark

target

It’s a Saturday night and HJ is out on the town-and all I would really like to do is watch David Tutera, Maid in Manhattan, and blog, (in between Pinning…of course). I have been thinking of some new blog posts, and thought I would share this one with you tonight-

I was perusing the Target aisles a month ago and found some great copy-cats of other name brand furniture. Here’s some of my favorite deals:

1. Xhilaration White Lacquer Floor Lamp now $59.99

image

It rivals the Stephen Antonson Nautilus Floor Lamp from West Elm “on sale” for $239.99.

west elm stephen antonson lamp


2. Then there’s the Threshold Mixed Material Side Table for $89.99.

image_7

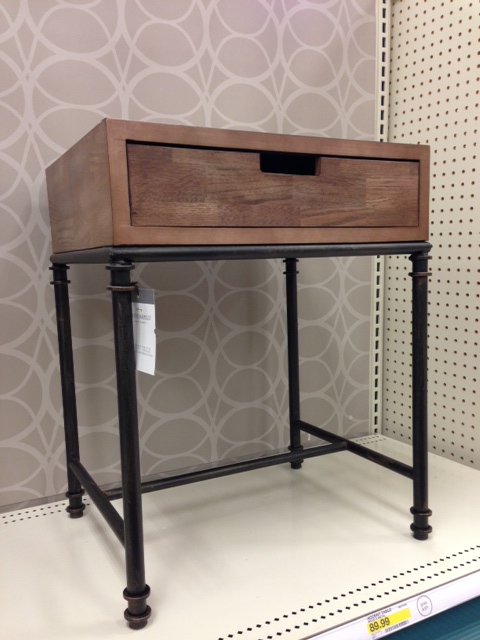
Similar to West Elm’s Rustic Storage Side Table for $299.00

west elm storage side table


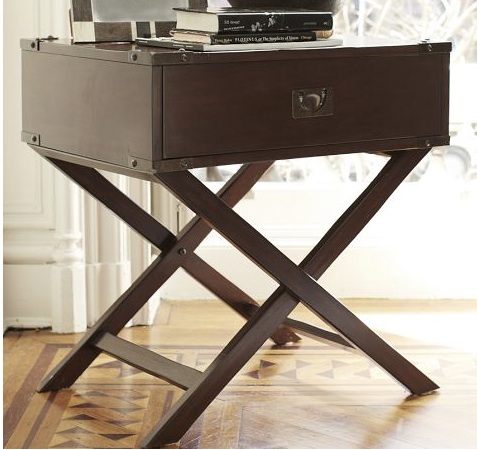
3. Check out this fun green Threshold Campaign Side Table for $79.99image_6


A lively substitute for Pottery Barn’s Devon Campaign Bedside Table for $299.00

pottery barn devon campaign table


4. Threshold Mixed Material Desk for $99.99

image_8


So close to Restoration Hardware’s Flatiron Desk for $595.00

restoration hardware flatiron desk


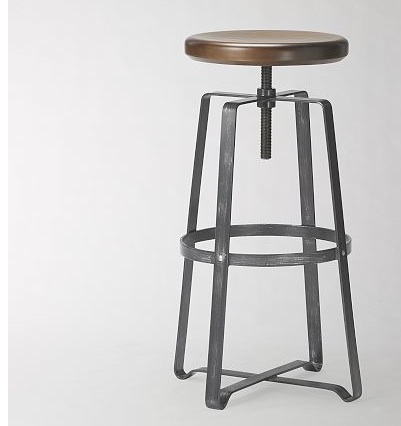
5. Threshold Lewiston Adjustable Height Swivel Stool for only $59.00

image_5

Could have mistaken it for  West Elm’s Industrial Stool for $179.00

west elm industrial stool


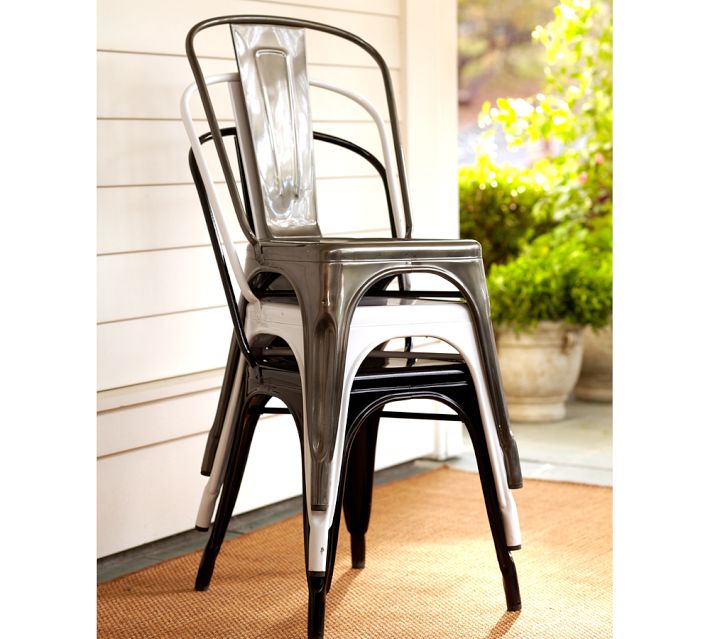
6. Love this colorful Carlisle Metal Bar Stool for $50.00!image_4


Pottery Barn carries the original Tolix Stool for $249.00

pottery barn tolix stool


7. If you love the stools, you might also like the Carlisle Dining Chair $42.49image_3


Again, check out Pottery Barn for the Tolix Cafe Chair, but for $269.00

pottery barn tolix chair


8. Threshold Brookline Tufted Dining Chair for $84.99 image_1

A more affordable option compared to Crate & Barrel’s Leeds Side Chair for $399.00

crate and barrel leeds chair

And while I was searching for the actual links for the Target pieces, I came across another doppelgänger-

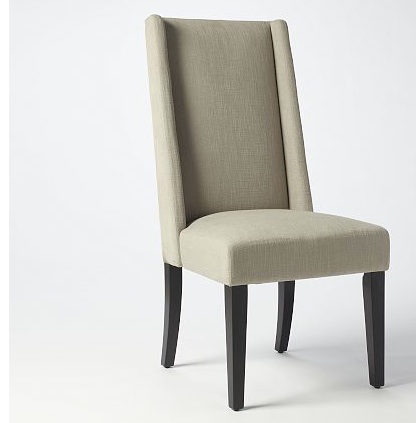
9. Target’s Charlie Modern Wingback Dining Chair for $94.99

charlie modern wingback dining chair

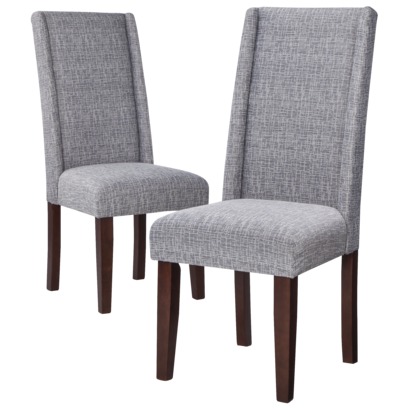
Versus West Elm’s Willoughby DIning Chair for $299.00

willoughby Dining Chair

Moral is: Go to Target before you splurge!

Headboard fit for a Queen…sized bed

So you probably noticed the updated headboard in the background of my fashion posts. Last time I posted about this, we left off here:

100_2817

But now, we have finished the headboard! But as you can see, not the whole bedding situation…

image_6

We started out using this trim, which I purchased from here

fabric farms nailheads

We just laid out where we wanted the trim to go and used our rubber mallet to hammer it into place!

image_1

image_5

image_2

image_3

image_4

So easy! It took us about 45 minutes total to move the headboard out from behind the bed, nail in the trim, and hang it on the wall! We also hung some black and white photos (that we had in our old bedroom) above our nightstands, so it feels more personal 🙂 We definitely have a ways to go, but at least this is looking better!

photo-12

Lets break down the cost:

IKEA Malm Headboard…………….$25.00 clearance

Linen fabric, batting, and mallet…$50.00

Nailhead Trim……………………….$20.00

Mounting Hardware………………..$10.00

GRAND TOTAL……………………..$110.00!!

This definitely beats the $300 one I had been pining after. And because we were able to hang it at whatever height we wanted, it gave us an even more dramatic effect than the more expensive options. We are so happy with the results. It makes us feel accomplished every time we see it!

IKEA Hack: Upholstered Malm Headboard

HJ and I have had this sad IKEA Malm headboard for the past 3 or so years. It was only $25.00 on Clearance, because they discontinued the finish (not surprised, it’s soooo boring…)

100_2792

I had always planned on doing something else with it, but just couldn’t decide what I would like best. So a few weeks ago, HJ and I went to the fabric store and bought 2 layers of batting and a textured linen fabric, for less than $50 bucks. Score! 🙂

Here’s how we did the transformation:

1. We read a ton of other blogs that did it before 🙂

2. We measured and added about 5 inches to the sides and top so we would have enough fabric and batting to wrap around the sides to staple

3. We knew we wanted to do a nailhead trim, and several blogs said that the shank of the nailhead wouldn’t pass through thick batting. So, we cut the first layer of batting 1″ smaller all around the top and sides to give padding to the center only. Then, we spray-mounted it in place. We did this step in our well-ventilated storage space in our apartment building, so we wouldn’t ruin our floors or furniture

100_2797

4. Then we wrapped the second layer of batting all the way around and stapled it to the back. We started in the center and worked our way out, as suggested in a few blogs. We also trimmed around the mounting hardware

100_2801 100_2799

5. Next, we just kinda guessed when we did the corners…basically, we cut the extra fabric off and left enough for there to be fluff around the edge

100_2806

100_2805

6. Before we wrapped the fabric, I made sure to give it a good ironing

7. We laid the headboard finished side up, so that we could make sure the fabric lines were straight. We stapled a few staples in the center of each side and top so that the fabric would be secure when we flipped the headboard over to finish stapling. See the nice “tufting” that was created on the back of the headboard with the staples? I really love that effect and wish that we could do it on the front, except that we don’t have anything to hide the staples…hmmm…?

100_2812

8. HJ folded the corners nice and crisp so that I would have nothing to obsess about 🙂

100_2814

9. The fabric and batting didn’t come in a width that was going to cover the entire headboard, but that was OK, because we knew it wasn’t going to be visible. So we just stapled the fabric and batting to the front, no problem!

100_2816

10. Ideally, this is where we would have used our new rubber mallet to hammer in the nailhead trim, but we just ordered it today from here

fabric farms nailheads

We got too excited to see the *almost* final result, so we put it back into place and will put the finishing touches on it as soon as our trim arrives in the mail!

100_2817

And the before again, just for fun:

100_2792

Once everything is finished, we will be mounting the headboard pretty high off the ground so that it will be really dramatic! Right now it is just sitting on the floor. I will do another updated post once we get the trim attached and I am also planning on doing another before and after post of the entire bedroom, since this is pretty much the last room we’re tackling 🙂 What do you think so far?

**See an update on this post here!**

Target Finds

This post is so overdue, I’m sure nothing that I am posting about is even at Target anymore, but I had good intentions…and don’t mind the Blackberry photo quality. I think I should just get a new camera already!

Look at this darling creamy white antiqued set of antlers:

IMG-20120930-00280

Then all of these beauties were in the clearance section. The colors aren’t showing up here too well, but they were a beautiful coral paired with turquoise:

IMG-20121008-00286 IMG-20121008-00285


And last, but not least, these bold graphic chevron jars. L-O-V-E

IMG-20121212-00330


I’ll keep my eyes open for any other cool finds, and hopefully post them sooner than 4 months after I find them…

Huntress Headquarters-Holiday Edition

Here is our home all decked out for Christmas! Hope it makes you feel as cozy as it does for us! This is also the first time you are seeing the Living Room/Dining Room/Kitchen all finished. So, I’ll show you some Before and Afters 🙂

Hallway Before:

Hallway

Hallway After:

100_2696

Kitchen Before:

Living 3

Kitchen After:

100_2685

Dining Room Before:

Living 1

Dining Room After:

100_2686

Living Room Before:

Living 2

Living Room After:

100_2701

And some more just for fun!

100_2690 100_2698 100_2691 100_2687 100_2685

Good Idea Confirmed!

We are  I am beginning to decorate for Christmas around here. So, to prolong some of my seasonal decor, I am repurposing some of my fall items.A few months ago, I paired a petite manzanita branch I bought at HomeGoods for $12.99 (much to Hunky J’s confusion “Why do you need to buy a branch when you can get them outside for free?!”) with an ominous black crow found at Michael’s for about $2.00.

But to answer your question, Darling, it’s because this one is aptly sized for vignettes, perfectly smooth, so we won’t have creepy bugs hiding in peeling bark, neutral enough so I can use it for all seasons, AND, because I saw it at HomeGoods, wanted it badly, but restrained, went back 2 weeks later and found it nestled in between a fake fern and a seashell encrusted picture frame 🙂

100_2610

I decided that I would relocate Manzi to another shelf in our kitchen, where she could make friends with a sweet little cardinal bird I got when HJ and I were in Peddler’s Village with our friends last month.

100_2673

So cute! He just clips right on, and he was only $4.99! As a side note, the shop where we got him had a beautiful bare tree with lots of different sized cardinals and owls made of twine and bark perched on its leafless branches 🙂 So pretty and wintry, you could leave it up the whole season long!

To confirm the awesomeness of my simple winter vignette, I came across this photo on Pinterest!

bird branch

source

And that’s why the I’m the MAN-zanita branch 🙂

Hallway!

We FINALLY got some work done in the hallway! Here is a before picture of the hallway leading into our home:

And here is the Progress:


and one more, just because 🙂


The long blue wall opposite Owlie will soon have a picture ledge with lots of family photos. Stay tuned, hopefully HJ will do this for me this weekend, ya know, as an anniversary present!


How To: Minimize a Large TV

When we first started looking for a large TV, we both agreed that a 37″ would be the best for our living room, since the couch is pretty close to the entertainment center. We found a great deal, so Hunky J lovingly took it upon himself to pick it up from the store. I was super excited when I saw the box in the back of the car! But upon closer inspection, I realized that  there must have been a mixup at the store…it was a 42″ TV!

OK, I knew there wasn’t a mixup. HJ just couldn’t help himself when he saw that we could get a bigger TV for less money than the 37″. I couldn’t be mad, he was scoring us a sweet deal! (Since then, I must admit, I could have even gone for a bigger screen)

Anyway, the problem that ensued was having a TV that suddenly became the focal point 😦

I don’t even have any before photos, because it looked so cumbersome.

Our solution was to hang a shelf above the TV, but low, so that it looked like a whole entertainment center, instead of a GIANT TV. Take a look at these:

source

source

So here is a quick Photoshopped of ours Before:

And After:

Much better!

Number 22.

Wanna see my long list I talked about here?

  1. Hang mirror in hall
  2. Hang frames in bedroom
  3. Make Master headboard
  4. Buy all new slim hangers for my closet
  5. Get a bathmat for Master shower
  6. Buy 2 new pillows for Master bed
  7. Get shams for Master bed pillows
  8. Find solution for hiding Master bath linen closet
  9. Find bench/perch for Master shower
  10. Find storage solution for Master shower bottles
  11. Hang frame in Master bath
  12. Make guest headboard
  13. Buy bedskirt for guest bed
  14. Fix up gold side table
  15. Photo for corner chair in Living Room
  16. Buy new neutral fall/winter curtains
  17. Get hamper for Master bath
  18. Buy photo ledge for main hall
  19. Buy frames for main hall
  20. Hang shelf above the TV
  21. Buy comforter for bed
  22. Buy chair for corner in Living Room

Some of these I haven’t even blogged about! Shame on me! But I really want to concentrate on that last one. Number 22. We have a little corner spot to the left in our Living Room that needed some love. Don’t mind the old picture. I have SO much to catch up on with apartment updates, since I have been concentrating on fashion for a while…)

I was envisioning something like this one from Restoration Hardware’s Nailhead Collection for $399.00

But then I found this one at HomeGoods:

LOVE.AT.FIRST.SIGHT and it was on clearance for $200.00 🙂 With some extra maneuvering, I was able to have my mom pick this up for me and drop it off! Thanks, Mom! #smallroundcar

Already smug with my find, I came across this baby a few days later in a boutique, while I was out shopping for work:

Let’s get a better look at that price, shall we?

Hmmm, well, Little Boutique on Main, try comparing to The Huntress’ latest steal! I can’t help it! I am a bargain hunter through and through. This only proved that my skills are better than ever 🙂

So here she is in her autumnal attire:

She still needs a friendly table mate and some artwork (See #s 14 and 15…) But, I love everything about her! The textured linen fabric, bronze nailhead finishing, elegant wings that are structured and square, but with feminine curves and slopes. I think if I were a chair, I would be her!